Keeping your Bissell vacuum clean is just as important as using it regularly. Over time, dust, pet hair, and tiny debris can build up inside the filters, brush roll, and hose, reducing suction power and making the machine work harder than it should.
A dirty vacuum not only struggles to pick up dirt effectively but can also release unpleasant odors and shorten the lifespan of its parts.
Bissell vacuums are designed for durability and strong performance, but like any appliance, they need routine maintenance to stay at their best. The good news is that cleaning your vacuum doesn’t have to be complicated or time-consuming.
With the right steps, you can easily remove clogs, wash filters, and clear the brush roll, all from the comfort of your home.
In this guide, we’ll walk you through exactly how to clean a Bissell vacuum, from quick weekly touch-ups to thorough deep cleaning sessions.
Whether you own a bagless upright, cordless stick, or pet-focused model, these tips will help you keep your vacuum brands running smoothly, extend its lifespan, and ensure your home stays cleaner with less effort.

Why Cleaning Your Bissell Vacuum Matters
How a Dirty Vacuum Affects Performance
Reduced suction power
When dirt and debris build up in your Bissell vacuum’s filter, brush roll, or hose, airflow becomes restricted. This causes the motor to work harder, which reduces suction power and leaves more dust behind on your floors.
If you’ve noticed your vacuum isn’t picking up as much as it used to, it’s often a sign that it’s time to focus on how to clean Bissell vacuum parts thoroughly. A clean filter and brush roll allow air to flow freely, restoring that strong suction you expect.
More Reads
how to remove filter from Dyson vacuum cleaner
how to clean Dyson vacuum cleaner V10
how to clean a Dyson handheld vacuum cleaner
Increased wear on parts
A clogged or dirty vacuum forces its motor, belt, and moving parts to work harder than necessary. Over time, this extra strain can lead to premature wear, costly repairs, or even the need for a replacement.
Learning how to clean Bissell vacuum components like the dirt bin, hose, and roller is a simple way to reduce this stress and keep your machine running smoothly for years.
more reads
how much is Dyson V6 vacuum cleaner
can you change the battery on a Dyson vacuum cleaner
best Dyson vacuum cleaner
Bad odors and bacteria buildup
When dirt, pet hair, and food crumbs sit inside the vacuum, they can create unpleasant odors and even harbor bacteria or mold. This not only makes your home smell less fresh but can also worsen allergies.
Knowing how to clean Bissell vacuum filters and empty the dust bin regularly helps prevent odor buildup and keeps the air in your home cleaner.
also reads
best SEBO vacuum cleaner for home
what are SEBO vacuums
are SEBO vacuums better than Dyson
How Often Should You Clean a Bissell Vacuum?
General recommendation (monthly light cleaning, quarterly deep cleaning)
For most households, a light cleaning once a month—emptying the dirt bin, wiping down the exterior, and rinsing washable filters—is enough to maintain performance. Every three months, give your vacuum a deeper clean:
remove the brush roll, wash attachments, and check the hose for blockages. Following this schedule ensures you’re always on top of how to clean Bissell vacuum parts before they cause performance issues.
further reads
which SEBO vacuum is best for allergies
what is the best SEBO vacuum cleaner for carpets
best SEBO vacuum for pet hair
Adjusting frequency for pet owners or heavy use
If you have pets that shed or if your vacuum sees daily use, you’ll need to clean it more often. Pet hair and dander can quickly clog filters and wrap around the brush roll, reducing efficiency.
In these cases, learning how to clean Bissell vacuum tools every two weeks can help prevent clogs and odors while keeping your floors spotless.
moreover reads
how long do SEBO vacuums last
are SEBO vacuum cleaners good
best SEBO vacuum cleaner
Preparing to Clean Your Bissell Vacuum
Before diving into the actual steps of how to clean Bissell vacuum parts, it’s important to take a few minutes to prepare.
Gathering the right tools and ensuring safety will make the process smoother, faster, and more effective. Skipping this preparation can lead to missed spots or even damage to your vacuum.
recommended reads
why is Henry vacuum so popular
what else should I know about the Henry vacuum cleaner range
best Henry vacuum cleaner
Gather the Right Tools and Supplies
Cleaning your Bissell vacuum becomes much easier when you have everything ready beforehand. Here’s what you’ll need:
- Soft cloths or microfiber towels – Perfect for wiping dust off the exterior and cleaning delicate parts without scratching.
- Mild soap or dish detergent – Gentle enough to clean plastic components without causing damage.
- Warm water – Helps loosen dirt and rinse away debris.
- Small cleaning brush or old toothbrush – Useful for scrubbing stubborn grime from the brush roll or filter casing.
- Compressed air can – Ideal for blowing dust out of vents, crevices, and tight areas.
- Screwdriver (if needed) – Some Bissell models require removing screws to access the brush roll or other internal parts.
By preparing these supplies in advance, you’ll avoid stopping midway through your how to clean Bissell vacuum process to search for a missing tool. This simple step ensures you can focus entirely on cleaning without interruptions.
Safety First: Unplugging and Handling the Vacuum
Before you start cleaning, safety should be your first priority. Always unplug the vacuum from the power source to prevent accidental startups or electrical hazards.
Even if your vacuum is cordless, make sure it’s powered off and the battery is removed, if possible.
Once unplugged, handle the vacuum carefully. Many Bissell models have detachable parts, such as the dirt bin, filters, or brush roll covers.
Remove these components gently, following the instructions in your user manual. Avoid forcing anything apart, as that can cause cracks or breakages.
Taking these precautions before starting how to clean Bissell vacuum parts not only keeps you safe but also protects the machine from accidental damage.
A careful approach at the start will make the rest of the cleaning process more efficient and problem-free.
Step-by-Step Guide to Cleaning a Bissell Vacuum
If you want your machine to keep performing at its best, knowing how to clean Bissell vacuum parts in the right order makes a big difference.
This step-by-step process covers everything from emptying the dirt bin to wiping down the exterior, ensuring your vacuum is fresh, efficient, and ready for action.
don’t miss
how many different Henry vacuums are there
can robot vacuums replace regular vacuums
Step 1 — Empty and Wash the Dirt Bin (or Bag Replacement)
For bagless Bissell vacuums, start by removing the dirt bin. Hold it over a trash can and empty all debris, tapping lightly to shake loose any stuck particles.
Rinse the bin with warm, soapy water, and use a soft cloth or sponge to clean any stubborn dirt inside. Make sure the bin is completely dry before reattaching it to the vacuum to avoid mold or mildew growth.
For bagged Bissell models, simply remove the used vacuum bag and replace it with a fresh one.
Never reuse disposable bags, as this can reduce suction power and spread dust back into the air. Following this step regularly is one of the easiest ways to keep up with how to clean Bissell vacuum maintenance.
Step 2 — Clean or Replace the Filters
Bissell vacuums often have multiple filters—usually a pre-motor filter and a post-motor or HEPA filter. Check your model’s manual to locate them.
- Foam and washable filters: Rinse under lukewarm water until the water runs clear. Avoid using harsh detergents unless the manufacturer specifies otherwise.
- HEPA or non-washable filters: Replace them every 3–6 months, depending on usage.
Always allow washable filters to air dry completely—at least 24 hours—before placing them back inside the vacuum.
Damp filters can damage the motor and encourage bacterial growth. Proper filter care is a critical part of learning how to clean Bissell vacuum units effectively.
Step 3 — Clean the Brush Roll and Remove Hair Tangles
The brush roll works hard to pull dirt and debris from your floors, but it’s also where pet hair, string, and carpet fibers tend to wrap around and cause blockages.
- Remove the roller cover (some models may need a screwdriver).
- Carefully cut away tangled hair or fibers with scissors or a seam ripper, taking care not to damage the bristles.
- Wipe the brush roll with a damp cloth and check for cracks or wear.
Keeping the brush roll clean helps maintain strong suction and prevents strain on the motor—an essential part of how to clean Bissell vacuum machines for optimal performance.
Step 4 — Clear the Hose and Attachments
Clogs in the hose or attachments can drastically reduce cleaning power. Detach the hose and check for obstructions by looking through it or gently pushing a broom handle through to dislodge blockages.
Wash the hose and attachments in warm, soapy water, and rinse thoroughly. Make sure every part is fully dry before reassembling to avoid mold growth.
This step is often overlooked, but it’s one of the most effective ways to master how to clean Bissell vacuum parts from top to bottom.
Step 5 — Wipe Down the Exterior and Wheels
Finally, give the exterior a quick refresh. Use a soft, damp cloth to wipe away dust, dirt, and fingerprints from the vacuum’s body.
Don’t forget to clean the wheels, as hair and debris can build up there and make it harder to maneuver.
This final step not only keeps your vacuum looking like new but also ensures it moves smoothly during use—another reason how to clean Bissell vacuum routines should always include exterior care.
Special Cleaning Tips for Popular Bissell Models
While the general steps for how to clean Bissell vacuum machines apply to most models, some have unique features that require extra attention.
Knowing these small differences can help you maintain your specific Bissell model more effectively and avoid common issues.
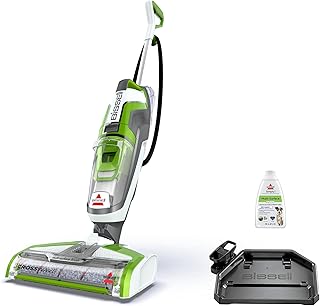
Bissell CrossWave Maintenance
The Bissell CrossWave is designed to vacuum and wash floors at the same time, which means it has extra water and brush components that need regular care.
After each use, empty both the dirty water tank and the clean water tank. Rinse them with warm water to prevent buildup and odors.
The multi-surface brush roll should be removed and washed under running water, then left to air dry completely before reinstalling. Pay attention to the nozzle area—wipe it down with a damp cloth to remove residue from cleaning solutions.
Since this model deals with both dry and wet messes, maintaining it is slightly different from standard vacuums.
Including these steps in your how to clean Bissell vacuum routine will keep the CrossWave performing like new and prevent unwanted smells.
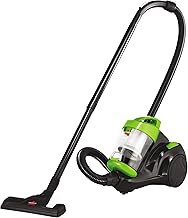
Bissell PowerForce Cleaning
The Bissell PowerForce is a strong upright vacuum known for its affordability and efficiency. To keep it in top condition, focus on its bagless dirt container and multi-level filtration system. Empty the dirt container after each use, and rinse it at least once a week if you vacuum frequently.
The foam pre-motor filter is washable—rinse it gently in cool water and let it dry fully before putting it back. The post-motor filter may need replacement every few months, depending on use.
Also, check the wide cleaning path for any blockages and keep the brush roll free from tangled hair or debris. These small tasks make a big difference in mastering how to clean Bissell vacuum units like the PowerForce.
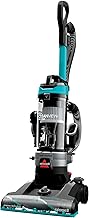
Bissell Pet Hair Eraser Care
The Bissell Pet Hair Eraser is designed specifically for homes with pets, which means it deals with extra fur, dander, and allergens.
Pet hair can quickly wrap around the tangle-free brush roll, so even though the design helps reduce clogs, you should still check and clean it regularly.
The SmartSeal Allergen System uses specialized filters—be sure to empty the dirt bin after each use and clean or replace filters on schedule to maintain strong suction and reduce allergens.
Attachments like the Pet TurboEraser Tool should be washed or brushed out often, as pet hair buildup can block airflow.
Including these details in your how to clean Bissell vacuum process ensures the Pet Hair Eraser stays effective for removing fur and keeping your home fresh.

Conclusion
Cleaning your Bissell vacuum doesn’t have to be complicated. Once you know the right steps, it becomes a quick and simple routine that keeps your machine in peak condition.
Regular maintenance not only improves suction power but also extends the life of your vacuum and ensures your home stays fresh and dust-free. By following this guide on how to clean a Bissell vacuum, you’ll keep your machine performing at its best for years to come, saving both time and money in the long run.
FAQs About How to Clean Bissell Vacuum
1. How often should I clean my Bissell vacuum?
For light household use, a monthly cleaning is usually enough. If you have pets or vacuum daily, you may need to clean your Bissell every two weeks to maintain strong suction and prevent odors.
2. Can I wash the filters in my Bissell vacuum?
Most Bissell foam filters are washable with lukewarm water, but HEPA filters are typically non-washable and should be replaced every 3–6 months. Always check your model’s manual before cleaning.
3. What’s the best way to remove hair from the brush roll?
Turn off and unplug the vacuum, remove the brush roll cover, and use scissors or a seam ripper to carefully cut away tangled hair or threads. This is an important part of how to clean Bissell vacuum units effectively.
4. How do I prevent bad odors in my Bissell vacuum?
Empty the dirt bin after every use, clean or replace filters regularly, and wash attachments as needed. A sprinkle of baking soda in the dirt bin can also help neutralize smells.
5. Do all Bissell vacuums have the same cleaning process?
While the basic steps are similar, some models like the CrossWave or Pet Hair Eraser have unique features that require extra care. Always follow your specific model’s maintenance guidelines when learning how to clean Bissell vacuum parts.