if you have shark robotic vacuum cleaner and your wondering about how to replace the battery in your Shark RV1001AE robot vacuum.
And If your Shark RV1001AE robot vacuum isn’t holding a charge like it used to or suddenly stops mid-clean, it may be time for a battery replacement. Over time, even the most efficient robot vacuums experience power loss due to normal battery wear.
While many users assume replacing the unit is the only option, there’s actually a simple fix: learning how to replace the battery in your Shark RV1001AE robot vacuum.
This guide walks you through everything you need to know — from identifying battery issues to safely swapping it out.
Whether you’re dealing with performance drops, charging failures, or just trying to extend the lifespan of your vacuum, understanding how to change the battery correctly can save you both time and money.
Replacing a battery may sound technical, but with the right steps and a little patience, it’s a DIY-friendly task. We’ll also share practical tips to ensure your branded vacuum runs efficiently long after the new battery is in place.

Why You Might Need to Replace the Battery in Your Shark RV1001AE Robot Vacuum
Battery-powered robot vacuums like the Shark RV1001AE are designed for convenience, but over time, even high-quality batteries begin to degrade.
If your robot isn’t performing like it used to, recognizing the early signs can help you avoid bigger issues later.
Below are 4 subheadings that logically expand on this topic while keeping the tone friendly, detailed, and SEO-optimized.
Diminished Runtime and Inconsistent Cleaning Cycles
One of the first signs that it’s time to learn how to replace the battery in your Shark RV1001AE robot vacuum is a noticeable drop in runtime.
A healthy battery should allow the vacuum to clean continuously for its full cycle. But if the vacuum runs for only a few minutes or randomly stops mid-session, the battery is likely reaching the end of its lifespan.
This reduced cleaning time affects your home’s cleanliness and the overall performance of the Shark robot vacuum. If left unresolved, it could eventually lead to complete battery failure.
The Vacuum Doesn’t Charge or Hold Power
Is your Shark RV1001AE refusing to charge or losing power shortly after docking? These are clear signs the battery is no longer functioning properly.
While checking for dust on charging contacts or dock alignment is a good idea, if those aren’t the issue,
the next step is understanding how to replace the battery in Shark RV1001AE robot vacuum to restore normal operation.
Using a weak or dying battery only adds stress to your vacuum’s system, potentially impacting other components over time.

Frequent Pausing or Returning to the Dock Too Soon
When your Shark robot vacuum prematurely returns to the dock or pauses frequently during cleaning, it’s often due to insufficient battery strength.
This behavior typically worsens over time, making your vacuum less reliable for daily use.
Replacing the battery is a straightforward solution that restores the vacuum’s full operating potential. Knowing how to change the battery in your Shark RV1001AE not only helps avoid these issues but also extends your vacuum’s life span.
Battery Warning Lights or Error Messages
Many Shark robot models, including the RV1001AE, are programmed to alert users when there’s a battery-related issue.
Flashing lights, charging errors, or app notifications could be warning signs that your current battery isn’t working correctly.
Rather than scheduling expensive repairs or assuming the whole unit is faulty, learning how to replace the battery in your Shark RV1001AE robot vacuum allows you to handle the issue affordably and efficiently.

Understanding the Battery Setup in Your Shark RV1001AE Robot Vacuum
Before diving into the actual steps of battery replacement, it’s helpful to know what kind of battery the Shark RV1001AE uses, where it’s located, and how it functions. This understanding helps users feel more confident and reduces the risk of damaging the vacuum during the replacement process.
Here are 4 subheadings that expand on this topic, keeping your content human-like, SEO-optimized, and naturally aligned with your keyword.
What Type of Battery Does the Shark RV1001AE Use?
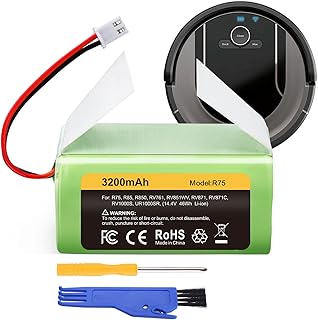
The Shark RV1001AE robot vacuum comes with a rechargeable lithium-ion battery, known for its balance of power and efficiency.
These batteries are lightweight, have a longer lifespan than older battery types, and are designed to support the demands of daily cleaning.
Knowing this is essential before purchasing a replacement. If you’re trying to learn how to replace the battery in your Shark RV1001AE robot vacuum, make sure the new battery matches the original specifications to avoid compatibility issues or performance drops.
Where Is the Battery Located in the Shark RV1001AE?
The battery in the Shark RV1001AE is securely placed inside a bottom compartment of the vacuum. It’s protected with a cover and held in place with screws.
Unlike some plug-and-play models, this setup requires a bit of disassembly — but don’t worry, it’s manageable with a simple screwdriver and a little patience.
Before starting the process, it helps to get familiar with the placement and structure so you can confidently follow the steps when it’s time to replace the battery in your Shark RV1001AE robot vacuum.

How the Battery Powers the Cleaning Cycle
The battery doesn’t just run the electric motor — it also powers sensors, navigation, Wi-Fi connectivity, and docking functions.
This means that when the battery starts to fail, you might notice your vacuum getting lost, skipping areas, or failing to dock correctly.
Understanding the battery’s role helps you appreciate why learning how to replace battery in Shark RV1001AE robot vacuum is not just about runtime — it’s about restoring full functionality.
How to Identify the Right Replacement Battery
Many third-party sellers offer generic batteries online, but not all are reliable. To ensure the best performance,
look for OEM (Original Equipment Manufacturer) batteries or high-quality compatible options that match the voltage and mAh (milliamp-hour) rating of the original.
Before you begin the replacement, double-check compatibility to avoid wasting time or risking damage.
A good battery match is essential when figuring out how to change the battery in your Shark RV1001AE robot vacuum without future problems.
Step-by-Step Guide: How to Replace Battery in Shark RV1001AE Robot Vacuum
If you’re ready to get hands-on, this section walks you through the full process of how to replace battery in Shark RV1001AE robot vacuum safely and efficiently.
Even if you’ve never opened up your robot vacuum before, these simple steps will make the process feel easy and approachable.
Power Off and Prepare the Vacuum
Before anything else, turn off your robot vacuum completely and unplug the charging dock. This ensures safety during the process and prevents short circuits.
Place the vacuum upside down on a soft surface like a towel or mat to avoid scratching the sensors or camera. Starting with the right prep can make your battery replacement task smooth and stress-free.
Remove the Bottom Cover Panel
Use a standard Phillips screwdriver to remove the screws securing the bottom plate. Keep the screws in a small container so you don’t misplace them.
Once the plate is off, you’ll see the battery compartment clearly. Shark RV1001AE’s battery is designed to be accessible for DIY replacement, even if it looks tucked away at first glance.
Disconnect and Remove the Old Battery
Carefully unplug the battery connector from the port. Grip the connector — not the wires — to avoid damage. Then lift out the old battery.
At this point, you’re halfway through the process of how to replace battery in your Shark RV1001AE robot vacuum — and things only get easier from here.
Insert the New Battery and Secure It
Place your new battery in the same position and plug in the connector firmly. Make sure the wire orientation matches the original setup.
Secure the battery in place and double-check that it’s seated properly before replacing the cover.
Reassemble and Test the Vacuum
Reattach the bottom plate, screw it back in, and flip the vacuum upright. Dock it and allow the battery to fully charge before running a cleaning cycle.
Once charged, test the vacuum to ensure everything is working as expected. If it powers on and moves without issues, you’ve successfully completed the process of replacing the battery in your Shark RV1001AE robot vacuum.
Battery Care Tips After Replacement
Now that your Shark RV1001AE is running like new again, it’s important to maintain your battery so it lasts longer. A few simple habits can go a long way in keeping your robot vacuum working at its best.
Charge Regularly, But Avoid Overcharging
Your Shark RV1001AE robot vacuum is designed to remain on the dock between cleanings, which helps it stay fully charged and ready for its next session.
However, if you’re planning to be away or not use the vacuum for an extended period (like on vacation or during seasonal use), it’s a good idea to unplug the charger after the battery is fully topped off.
Constant overcharging can gradually stress lithium-ion cells, especially if the battery isn’t being cycled often. While the Shark RV1001AE has built-in overcharge protection, minimizing continuous power flow is still a smart move.
Maintaining this balance helps your replacement battery last longer and perform at its best.
So even after learning how to replace battery in Shark RV1001AE robot vacuum, it’s just as important to follow these small daily habits to extend battery health and avoid premature wear.
Tip: If you store the vacuum for weeks, keep the battery at about 50% charge — not fully charged or fully empty — to preserve its lifespan.
Let the Battery Fully Drain Occasionally
Lithium-ion batteries don’t suffer from the old “memory effect” that affected older battery types, but occasional deep discharges can still help the internal software accurately measure the battery’s full capacity.
Letting your Shark RV1001AE run its full cycle until the battery drains — about once every 3 to 4 weeks — helps recalibrate the system. This ensures the vacuum’s battery level readings are more accurate and that you’re truly getting the maximum run time from each charge.
This habit is particularly useful after you replace the battery in your Shark RV1001AE robot vacuum, as it gives the new battery a chance to settle in and reach its optimal performance range.
Tip: Schedule a full-cycle clean once a month and let the vacuum return to the dock only after the battery naturally runs low.
Keep the Vacuum and Docking Area Clean
Even a fresh battery can underperform if your Shark vacuum’s charging contacts are blocked by dust, pet hair, or grime.
Over time, small amounts of buildup can prevent proper charging or cause slow power transfer, leading to unexpected shut-offs or inefficient charging.
After you’ve gone through the process of how to replace battery in Shark RV1001AE robot vacuum, make cleaning part of your weekly routine.
Wipe the charging contacts on both the robot and dock using a soft cloth or cotton swab slightly dampened with rubbing alcohol. Also, vacuum the surrounding area to avoid dust buildup on sensors and vents.
Maintaining a clean base area helps ensure your vacuum always docks correctly and charges efficiently — preserving the life of your new battery and improving overall performance.
Tip: Check and clean the dock area and bottom of the vacuum at least once a week, especially if you have pets or carpets.
Monitor Performance Over Time
After learning how to replace battery in Shark RV1001AE robot vacuum, it’s helpful to track how the new battery performs over time. If issues arise, catch them early by watching for run-time drops or charging delays.
This ensures you stay ahead of future battery-related problems — and avoid any unexpected interruptions in cleaning.
Conclusion
Replacing the battery in your Shark RV1001AE robot vacuum may seem technical at first, but with a little guidance and the right tools, it’s a simple process that most people can do at home.
Understanding how the battery works, recognizing signs of wear, and following a step-by-step approach helps you restore your vacuum’s cleaning power without needing a costly replacement unit.
By learning how to replace battery in Shark RV1001AE robot vacuum, you’re not just extending the life of your device — you’re also saving money and maintaining your vacuum’s efficiency.
Whether you use it daily or a few times a week, a fresh battery can make a noticeable difference in how well your vacuum performs.
Take care of your new battery, keep your vacuum clean, and enjoy hassle-free floor cleaning again.
FAQs
Can I replace the Shark RV1001AE battery myself, or should I hire a professional?
Yes, you can absolutely replace the battery yourself. The Shark RV1001AE was designed with accessible components, making it DIY-friendly. As long as you follow proper steps and safety precautions, there’s no need to hire a technician to learn how to replace battery in Shark RV1001AE robot vacuum.
How long does it take to replace the battery in a Shark RV1001AE robot vacuum?
The entire replacement process typically takes 15 to 30 minutes. This includes turning off the vacuum, removing the bottom cover, swapping out the battery, and reassembling the unit. Once you’re familiar with the steps, you’ll find changing the battery in your Shark RV1001AE is quick and easy.
What type of replacement battery should I use for my Shark RV1001AE?
Always use a lithium-ion battery that matches the original specifications — usually 14.4V and a similar mAh rating. OEM (Original Equipment Manufacturer) batteries are recommended for optimal performance. Using compatible, high-quality third-party batteries is also possible, but be sure to verify reviews and specs before purchase.